Free POS System for WordPress WooCommerce
As an online business owner, managing orders, inventory, and sales can be overwhelming. A POS (Point of Sale) system can help streamline these processes and increase efficiency.
This article will explore the benefits of using a POS system and how it can be integrated with the WordPress WooCommerce platform. We will also introduce a free POS system for WordPress WooCommerce (Vitepos) and explain how it can benefit your business.
Why use WooCommerce POS?
WooCommerce POS is a robust point of sale (POS) system that offers a wide range of benefits to retail businesses. One of the primary reasons to use WooCommerce POS is its seamless integration with WooCommerce, Which is one of the most popular e-commerce platforms in the world. This allows businesses to manage both their online and offline sales channels in a single platform, reducing complexity and improving efficiency.
In addition to this, WooCommerce POS (VitePos) offers real-time inventory management, which is crucial for businesses that need to manage large inventories across multiple locations. It also includes features such as product management, sales reporting, and customer management, all of which can help businesses streamline their operations and improve their bottom line.
A POS system is a combination of hardware and software that helps businesses manage their sales, inventory, and other operational processes. POS systems are used to process transactions, print receipts, manage inventory, and generate reports. They are commonly used in retail stores, restaurants, and other businesses that need to process transactions quickly and efficiently.
How a free POS system can help your business?
There are several types of POS systems available, including cloud-based (Anything that involves the delivery of hosted services via the internet), on-premise, and mobile POS systems. Cloud-based POS systems are becoming increasingly popular as they offer several advantages, including accessibility, scalability, and lower upfront costs.
Woocommerece pos is a free POS for WordPress and the benefits of using a POS system are numerous.
A free point of sale (POS) system can provide significant benefits to businesses looking to streamline their operations and improve their bottom line. Here are some ways that a free POS system can help your business:
- Process transactions quickly and accurately, reducing the risk of errors and delays.
- Manage inventory in real-time, allowing businesses to track stock levels across multiple locations and avoid stockouts.
- Generate reports on sales and customer data, providing businesses with valuable insights into their operations and customer behavior.
- Offer employee management tools, such as timekeeping and scheduling, helping businesses to manage their workforce more efficiently.
- Provide customer relationship management features, including the ability to track customer information and purchase history, which can help businesses build stronger relationships with their customers.
- Offer marketing tools, such as email campaigns and loyalty programs, which can help businesses attract and retain customers.
Overall, a free POS system can be an excellent investment for businesses of all sizes, providing them with the same level of functionality and efficiency as more expensive systems. While paid POS systems may offer more advanced features, a free POS system can still offer significant benefits to businesses looking to improve their operations and grow their bottom line.
How to set up Free POS System for WordPress
Step1. Install and Activate Vitepos
In order to set up a POS system, you must first install and activate the WooCommerce.
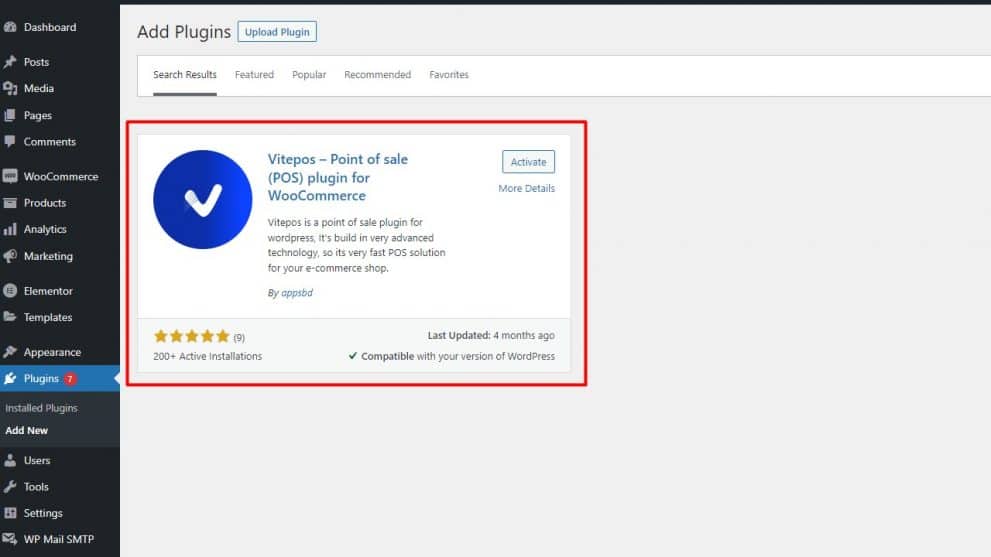
After that log in to the Admin panel of your WordPress site. Then Go to Plugins → Add New and find Vitepos from the search box.
Click and install it. As soon as the installation is complete, press the activate button to make it active.
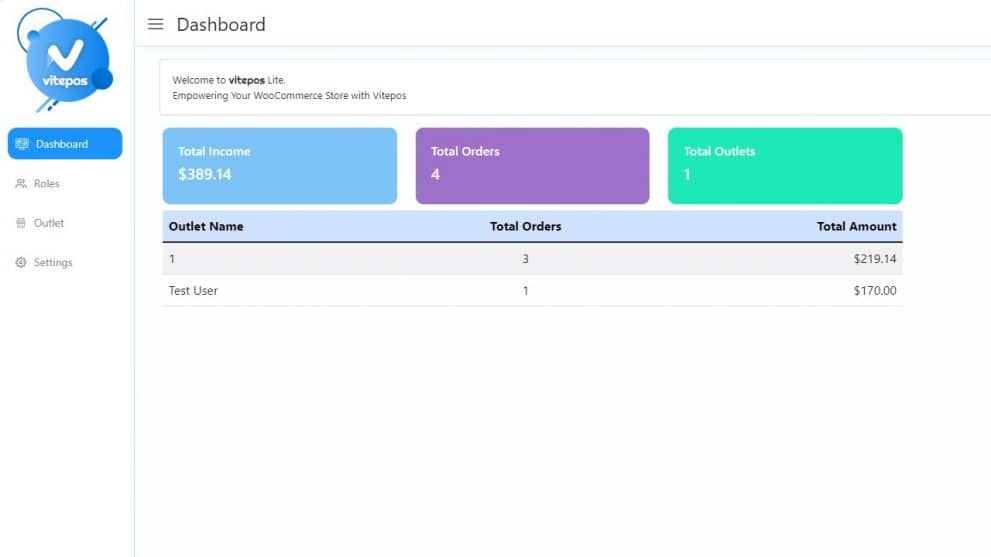
This is how your Vitepos dashboard will look like. This tab displays a summary of your business, including total income, total orders, and total outlets.
Step2. Configuring Roles
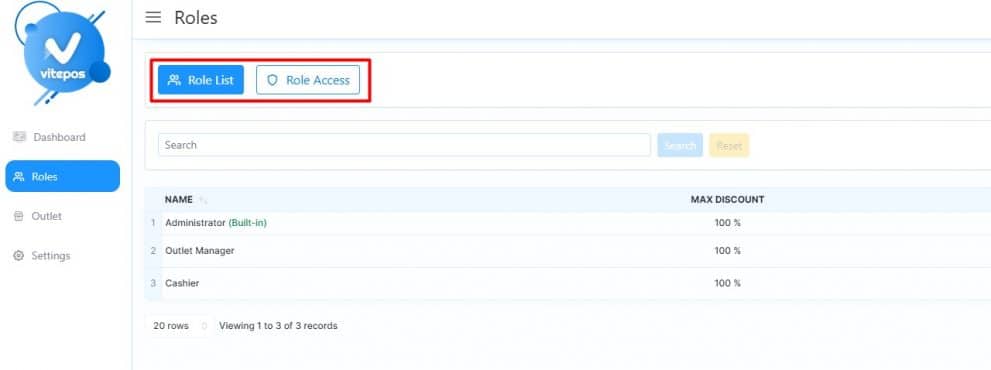
There are several roles that you can select in the Roles tab, like Outlet Manager, Cashier, etc. The system comes with a built-in administrator as well. The search bar makes it easy to find any information within a large database.
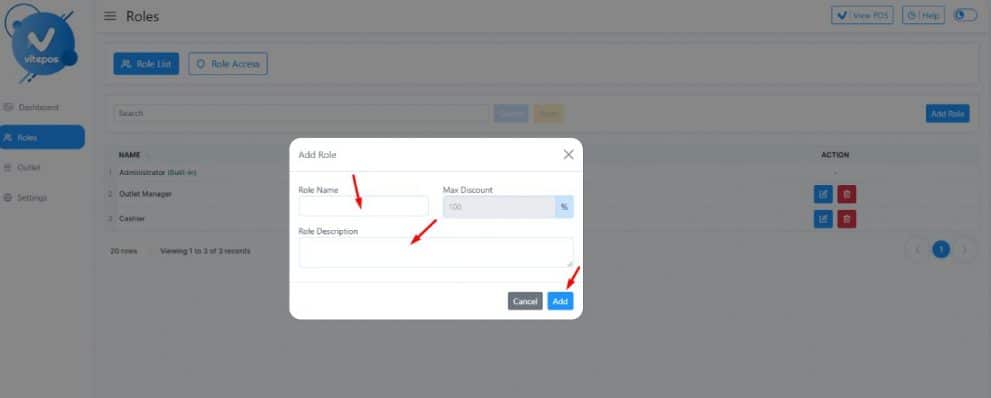
To increase the number of available roles, simply click the “Add Role” button. Upon doing so, you will be prompted to provide the role name, role description, and applicable discount value.
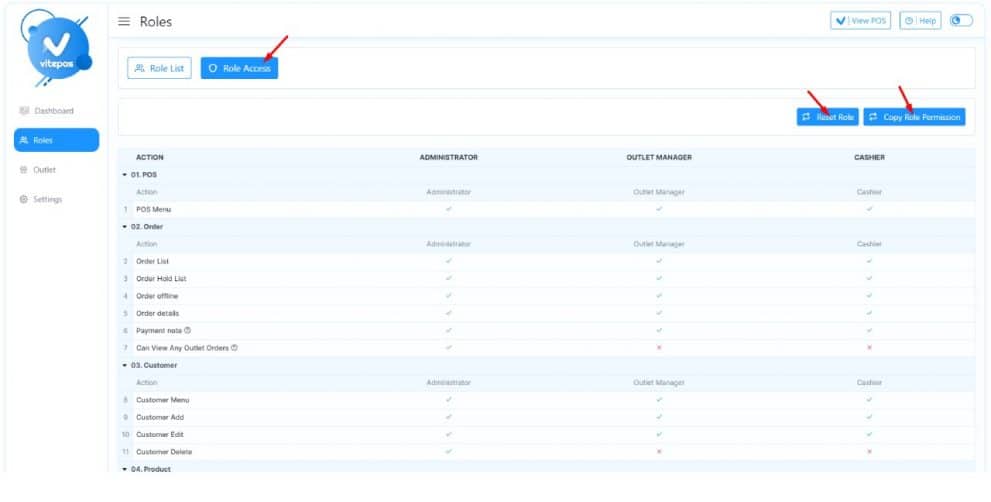
Additionally, you will find a section titled “Role Access” where you have the ability to reset individual roles and copy permissions from one role to another.
Step3. Outlet Settings for WooCommerce POS
In the outlet section, you will be prompted to input an outlet name and counter number. The option to add multiple outlets is available by selecting the “Add Outlet” button. However, to enable the creation of multiple outlets, activation of the pro version of Vitepos is required.
Step4. Barcode Scanner and Other POS Settings
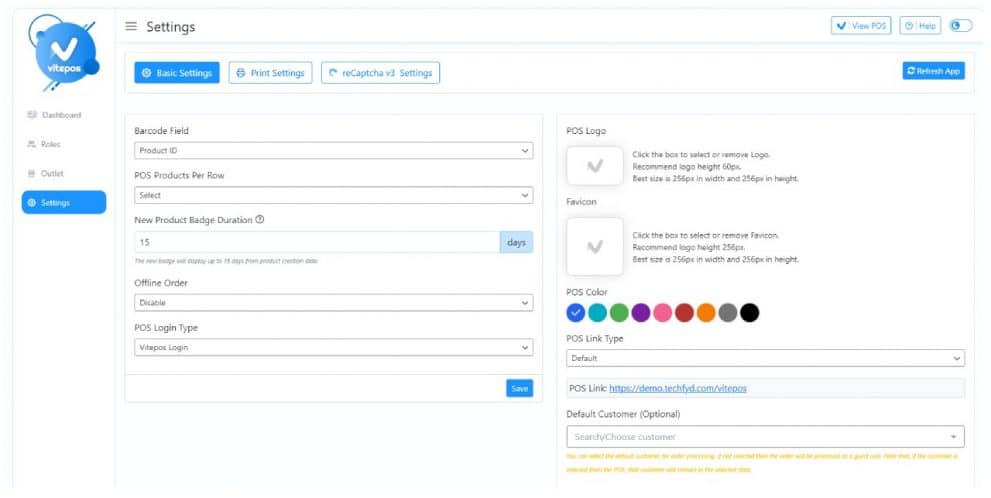
Within the Settings tab, you will encounter three distinct settings sections: Basic Settings, Print Settings, and Recaptcha Settings.
In the Basic Settings section, it is necessary to select the barcode field that will accurately reflect the product data upon scanning. You may choose from the following options:
- Product ID: Select this option if your store employs IDs on products.
- SKU: Choose this option if your store utilizes SKUs on products.
- Custom Field: Opt for this option if you prefer to manually set barcode numbers for each product.
You can Select the POS Products Per Row.
POS Products Per Row: It refers to the maximum number of products that can be displayed in a single row within the POS interface. This setting is configurable and can be adjusted to suit your preference and requirements.
New Product Badge Duration: You will find an option to set the duration in days for New Badge on product.
You may Enable/ Disable the Offline Order and also select the POS Login Type to either the Vitpos login or WordPress login.
Remember to click on Save Changes after selecting the fields.
Here you will find options for adding the Pos logo, Favicon, color, Pos Link type, and Default customer.
POS Link Type: You can set the POS link type to the default or Page. If you set it to the page then you have to select the POS page.
Default customer: You can select the default customer for order processing. If not selected then the order will be processed as a guest user. Note that, if the customer is selected from the POS, that customer will remain in the selected state.
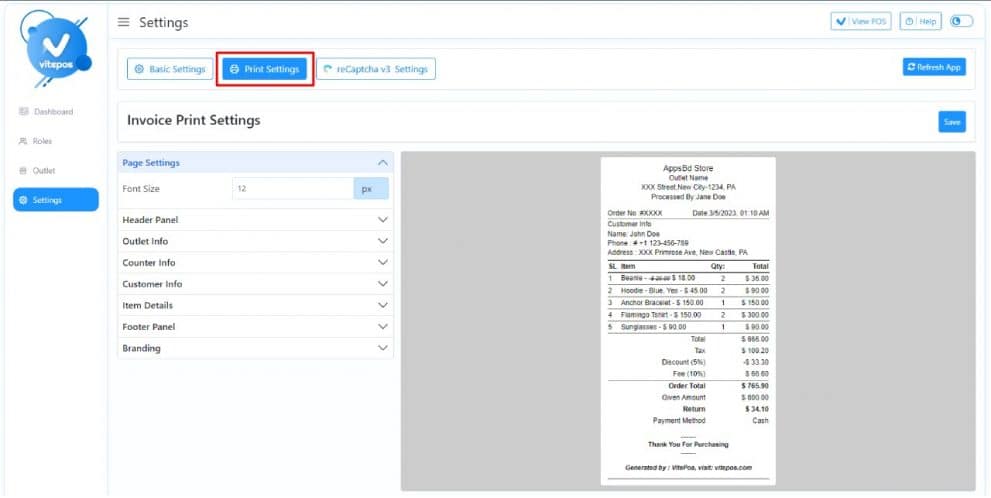
In the print settings section, you will see Invoice Print Settings. This feature allows users to fully select and personalize every element of the invoice as per their preference.
In the Recaptcha v3 settings, you have the option to enable Recaptcha. If you enable it then it requires Site Key and Secret Key. So then you have to add the site key and secret key. Simply click on “Save” once you have entered the necessary information.
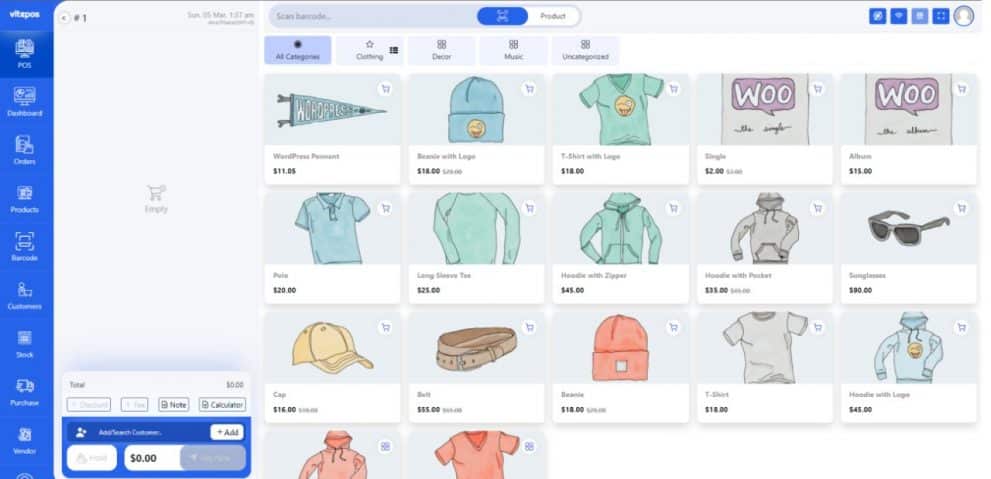
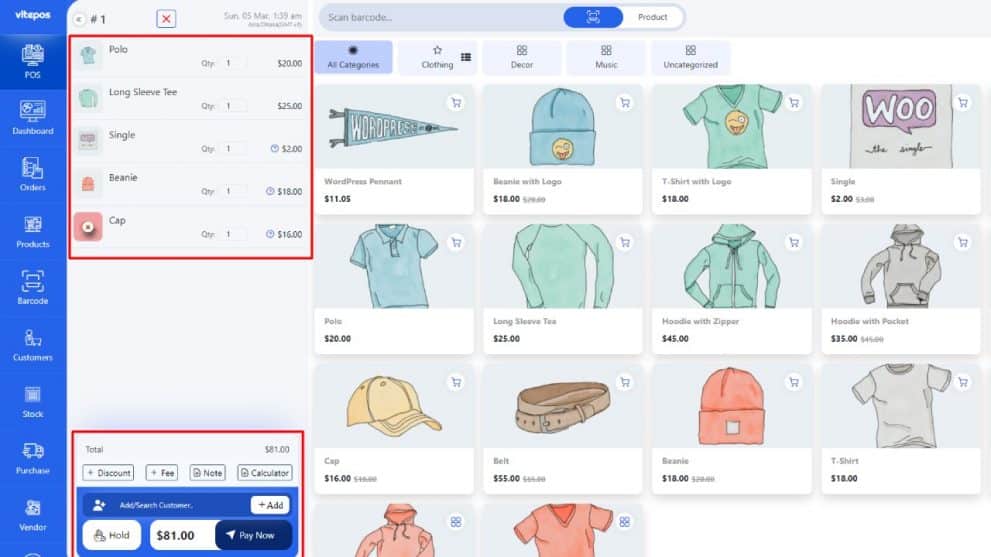
Now click View POS to check the POS. The interface will appear like this.
Step5. Add Products and Cart Management
After adding products and customers click on the Pay Now button.
Step6. Checkout
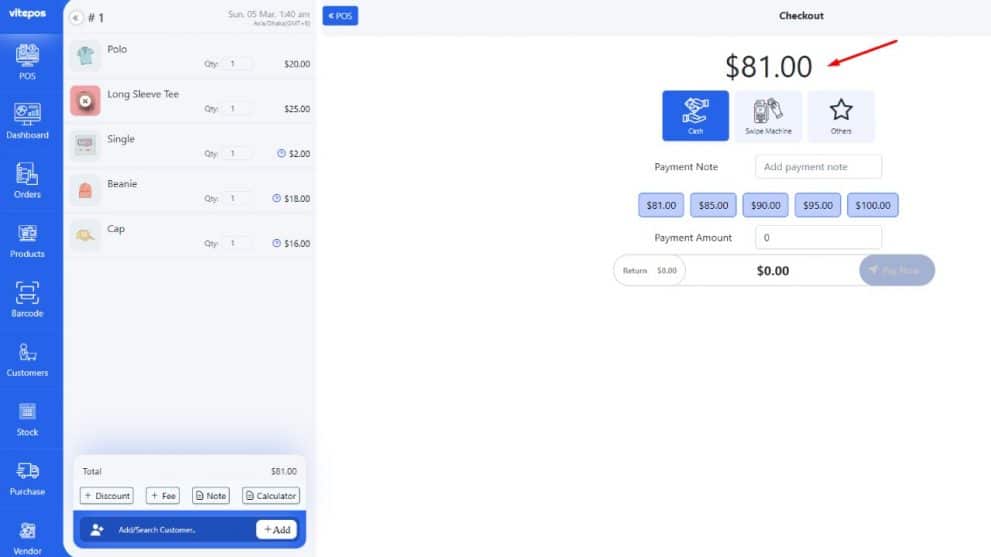
This checkout page will appear here. It will display the summary of your sale and the total amount. You can select Cash, Swipe Machine, or Others.
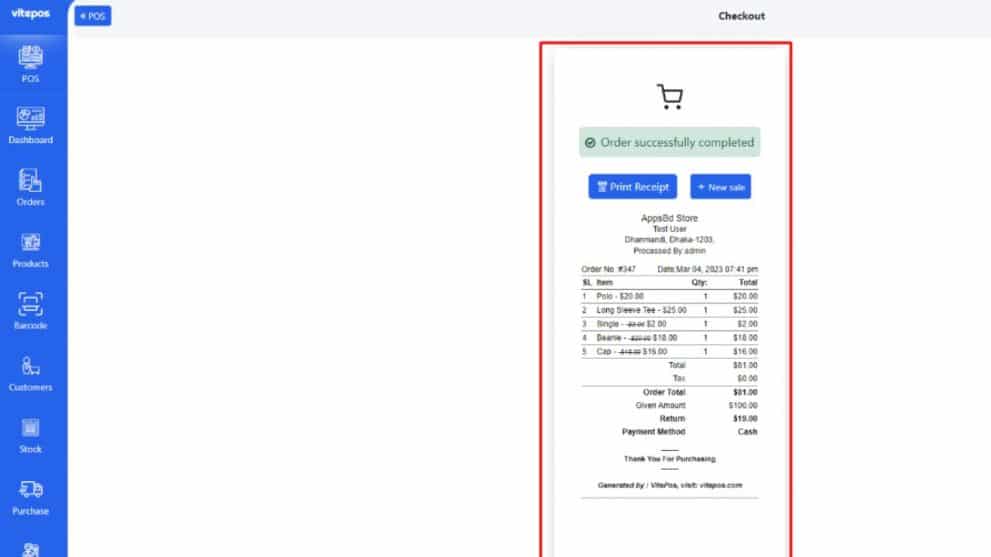
After completing the payment this invoice will appear. You can print it and go for the New sale.
This is how to build a free POS for WordPress with the Vitepos plugin.
Can I use a tablet or smartphone for a POS?
You can absolutely use a tablet or smartphone as a POS system!
In fact, many businesses are moving to use tablets and smartphones as their primary POS systems because of the flexibility and portability they offer.
There are a number of POS apps available that can turn your tablet or smartphone into a fully functioning POS system, and many of them are very affordable. Whether you’re a small business or a large enterprise, using a tablet or smartphone as your POS system can be a great way to save money and increase efficiency
Will this work for my business?
It depends on a number of factors, including the size and type of your business, your budget, and your specific needs and requirements. Point of sale systems are designed to streamline the sales process for businesses. They can be used to track inventory, manage customer data, and process payments.
But not all businesses will benefit from using a POS system. businesses that have a very small number of SKUs, for example, may not find a POS system to be worth the investment. businesses that sell primarily through word-of-mouth or that don’t have a lot of foot traffic may also not find a POS system to be beneficial. Ultimately, it’s up to the business owner to decide whether a POS system is right for their business.
However, in general, a POS system can be a great way to streamline your business operations, improve efficiency, and boost your bottom line. If you’re considering investing in a POS system, it’s important to do your research and choose a system that will meet your specific needs.
Free POS system for WordPress WooCommerce by Simplepay
Simplepay’s free POS system for WordPress WooCommerce is an innovative solution that simplifies and streamlines the checkout process for in-person transactions. It allows you to manage your physical store operations and online transactions from one centralized system.
The POS system is designed to help small business owners like you increase efficiency and productivity while offering a seamless checkout experience to your customers. It’s an easy-to-use solution that integrates seamlessly with your WooCommerce store, eliminating the need for manual entry of sales data.
With Simplepay’s POS system, you can manage inventory, create product catalogs, and generate real-time reports to monitor your business’s performance. Additionally, the system is equipped with the latest security features to ensure that all transactions are safe and secure.
This innovative solution offers a range of benefits for small business owners, including reducing checkout time, increasing customer satisfaction, and improving overall business operations.
How to integrate a POS system in your online store
If you’re running an online store, you might be considering adding a POS (point of sale) system to help streamline transactions and make your business more efficient. Here’s how to integrate a POS system into your online store:
- Decide which POS system you want to use. There are many different options on the market, so do some research to find the one that’s right for your business. For example, Vitepos is one of the best WooCommerce pos plugin.
- Set up your POS system. This will involve installing the software and configuring it to work with your online store.
- Train your staff on how to use the POS system. They’ll need to know how to add items, process payments, and troubleshoot any issues that might come up.
- Start using the POS system for all transactions. Once it’s up and running, you can start using it for all transactions, both in-person and online.
- Monitor your sales data. The POS system will generate a lot of data about your sales, so be sure to track it closely. This will help you identify any areas where the system isn’t working as well as it could be.
Is it possible to pay with cash when you use a free POS system for WooCommerce?
Yes, it is possible to accept cash payments when using a free Woocommerce POS system. The payment options available in a POS system are typically independent of the pricing plan. Even with a free POS system, you can still accept cash, credit/debit cards, and other forms of payment depending on the payment gateway integrations available in your POS system.
Conclusion
POS (VitePos) is a good choice for any business. You’ll need to run software on a computer for a POS system to work. If you’re starting a retail business, you’ll probably want to invest a little more in a POS system for WooCommerce, but you can try out the best free POS system for WooCommerce before you make the decision.
To increase the number of available roles, simply click the “Add Role” button. Upon doing so, you will be prompted to provide the role name, role description, and applicable discount value.

